Mastering the Safe Haven IBS API: Account Creation, Sub-Accounts, and Account Management
Account API, Open banking, banking API, Reserved Account, Wallet Account, virtual account, Safe Haven IBS, Sub-account, API, endpoint, OAuth2
The Safe Haven IBS API provides a robust financial infrastructure for developers to programmatically create sub-accounts. Its suite of endpoints enables businesses to build scalable fintech solutions for both individual and corporate banking needs.
Account creation is one of the most important parts of any fintech product. Before users can receive funds, hold balances, generate statements, or perform account-level operations, your backend needs a reliable way to create and manage accounts through a banking infrastructure provider.
The Safe Haven IBS API provides account-management capabilities that allow developers to create and manage accounts programmatically. This includes primary accounts, sub-accounts, and account statement retrieval. Used properly, these endpoints can help a fintech product support collections, wallet balances, business accounts, customer-specific accounts, and transaction-history workflows.
But account creation should not be explained as a random list of endpoints. It works better as a flow. You authenticate your application, verify the customer or business identity, create the required account structure, decide how funds should behave inside the sub-account, and then manage the account after creation.
Getting Started and Authentication
To begin, register on the SafeHaven platform and create an application in your developer dashboard. Authentication is detailed in the post: Safe Haven OAuth 2.0 Client Assertion.
Understand the Account Structure Before Creating Anything
A common mistake in technical documentation is to jump directly into account creation without explaining the account hierarchy. For developers, the hierarchy is important because it determines how accounts are created and managed and how funds are reconciled later.
The primary account sits at the top of the account structure. It belongs to the authenticated profile and acts as the anchor for further account operations. From there, the business can create sub-accounts for individuals, businesses, customers, merchants, or other internal use cases.
Before creating certain account types, identity verification is usually required. This step ensures that the person or business behind the account can be validated before financial services are activated.
Step 1: Initiate Identity Verification
Initializes the verification process by sending an OTP to the user and returning a unique verification ID to complete the process.
- You call the Initiate Verification endpoint.
- This sends an OTP (One-Time Password) to the user’s registered phone number.
- The API response returns an _id (verification ID). This is very important for the next step.
What you need to send:
- Identity type (e.g., BVN, NIN, vBVN, CAC, etc.)
What you get:
- A verification session ID (_id)
- OTP sent to user
Step 2: Validate the Verification
Completes the verification by validating the OTP and returning the user’s verified identity details.
- You call the validation verification endpoint.
- You must include:
- identityId → the _id from Step 1
- type → (BVN or NIN, etc.)
- OTP → the code sent to the user
- If successful:
- The system returns verified user data (name, DOB, etc.)
What happens here:
- OTP is checked
- Identity is confirmed
- Verified data is returned
Step 3: Create Safe Haven Account
Create the Primary Account
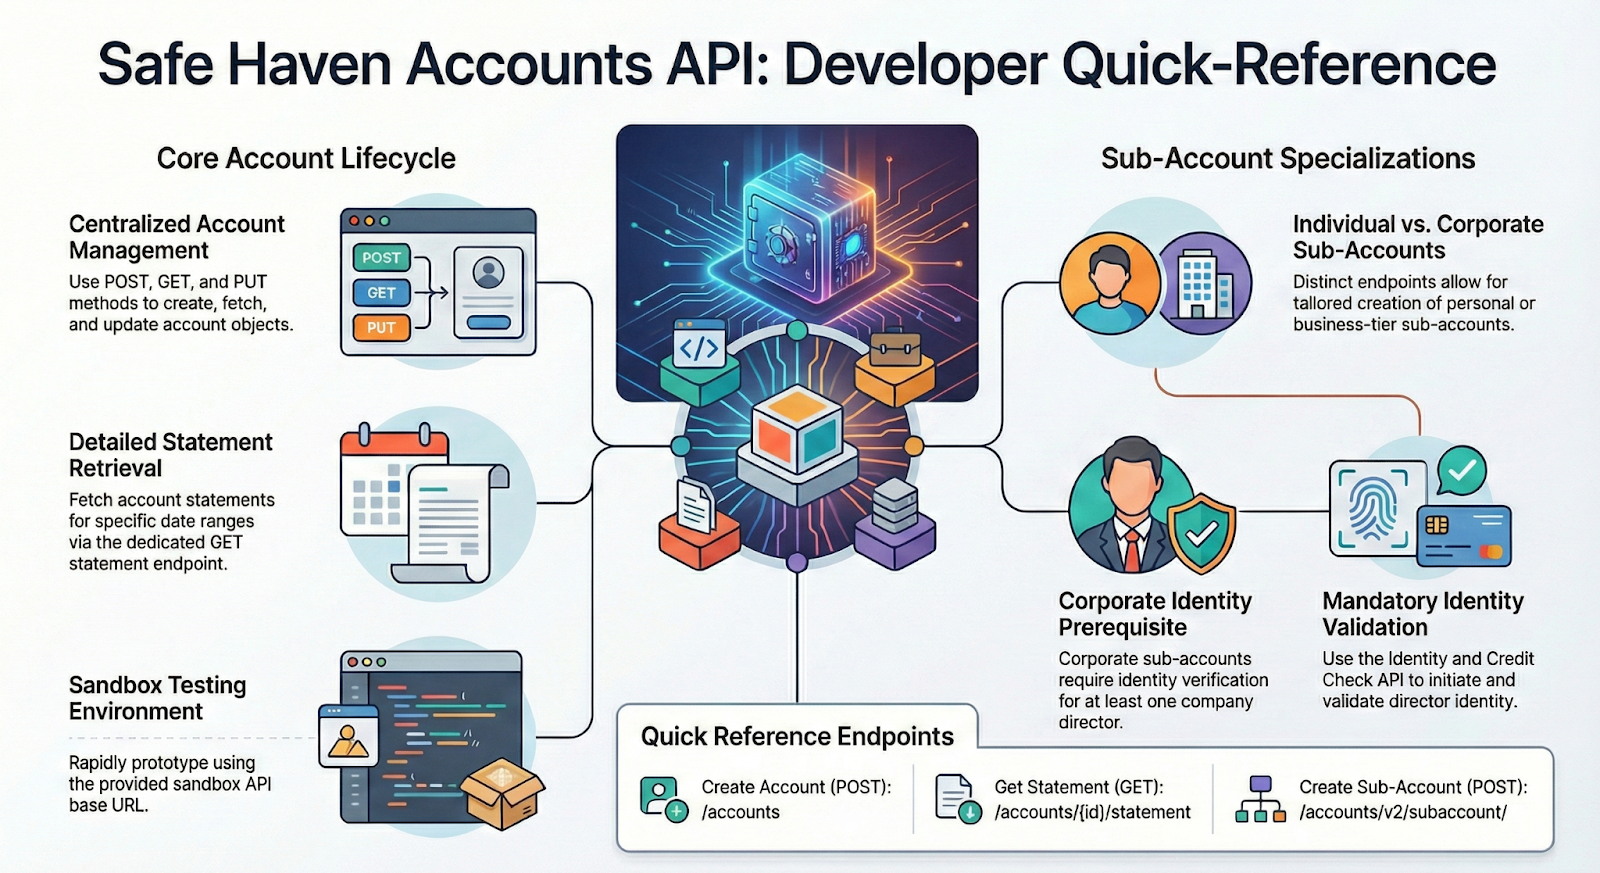
The primary account is created using the account creation endpoint: POST /accounts.
This account is created under the authenticated profile and becomes the foundation for subsequent account operations. For many businesses, the primary account is not the final customer-facing account. Instead, it acts as the base account that allows the platform to create and manage sub-accounts.
Creation of subaccounts
The foundation of the API is its account management system. This system is designed to be hierarchical, allowing a single developer profile to manage numerous nested accounts.
Primary Profile Accounts
The process usually begins by creating a primary account. Using the POST /accounts endpoint, you can create a new account directly under your authenticated profile. This account serves as the anchor for further operations within the IBS ecosystem.
Sub-Accounts: Individual vs. Corporate
- Individual Sub-Accounts: These are streamlined for personal use cases and are created using the POST https://api.sandbox.safehavenmfb.com/accounts/v2/subaccount endpoint.
- Corporate Sub-Accounts: These are designed for registered businesses and carry stricter regulatory requirements.
Autosweep vs. Non-Autosweep Sub-Accounts
Autosweep vs. non-autosweep sub-accounts are distinguished by what happens to funds after they enter the account, which determines the appropriate account flow.
Autosweep Sub-Accounts
An autosweep sub-account automatically moves incoming funds from the sub-account to a configured parent, settlement, or main account. This is useful when the sub-account is mainly used for collections, and the business does not want funds to remain in each sub-account.
Autosweep is best for merchant collections, centralized settlement, and treasury control.
Non-Autosweep Sub-Accounts
A non-autosweep sub-account keeps funds in the sub-account until your application or operations process moves them. This is better for wallet-style experiences where each user, merchant, or business account needs to maintain its own balance.
Non-autosweep is best for wallet balances, user-specific fund management, and account-level transaction history.
Step 4: Managing and Updating Accounts
Retrieve and maintain existing accounts by fetching their details and updating them as needed.
View All Accounts
This operation allows you to fetch and display all accounts in your profile, making it easy to manage users at scale.
Endpoint: Get Accounts: GET https://api.sandbox.safehavenmfb.com/accounts
Key Points
- Retrieves a list of all existing accounts in your system.
View a Single Account
This endpoint provides a detailed view of a specific account, enabling precise inspection and user-level operations.
Endpoint: Get Account: GET https://api.sandbox.safehavenmfb.com/accounts/{id}
Key Points
- Fetches detailed information for one specific account.
- Requires a unique account identifier (ID).
Update an Account
The update process successfully applied the new values to the account data.
Endpoint: Update Sub Account: GET https://api.sandbox.safehavenmfb.com/accounts/{id}/subaccount
Endpoint: Update Account
Key Points
- Used to modify existing account information.
- Requires:
- Account ID (in the URL)
- Updated fields (in the request body)
Step 5: Financial Auditing: Account Statements
One of the most critical features of any banking application is the ability to generate a transaction history. The GET https://api.sandbox.safehavenmfb.com/accounts/{id}/statement endpoint is designed for this purpose.
- Functionality: It returns the account statement for a specific account.
- Parameters: By defining a date range field, you can filter transactional data so users can access only records relevant to a specific period or month.
- Use Case: This is the backend engine for generating PDF statements or in-app transaction history lists.
Environment Switching: Always start development in the sandbox before moving to production. This ensures that your account-creation logic is sound before real identities and funds are involved.